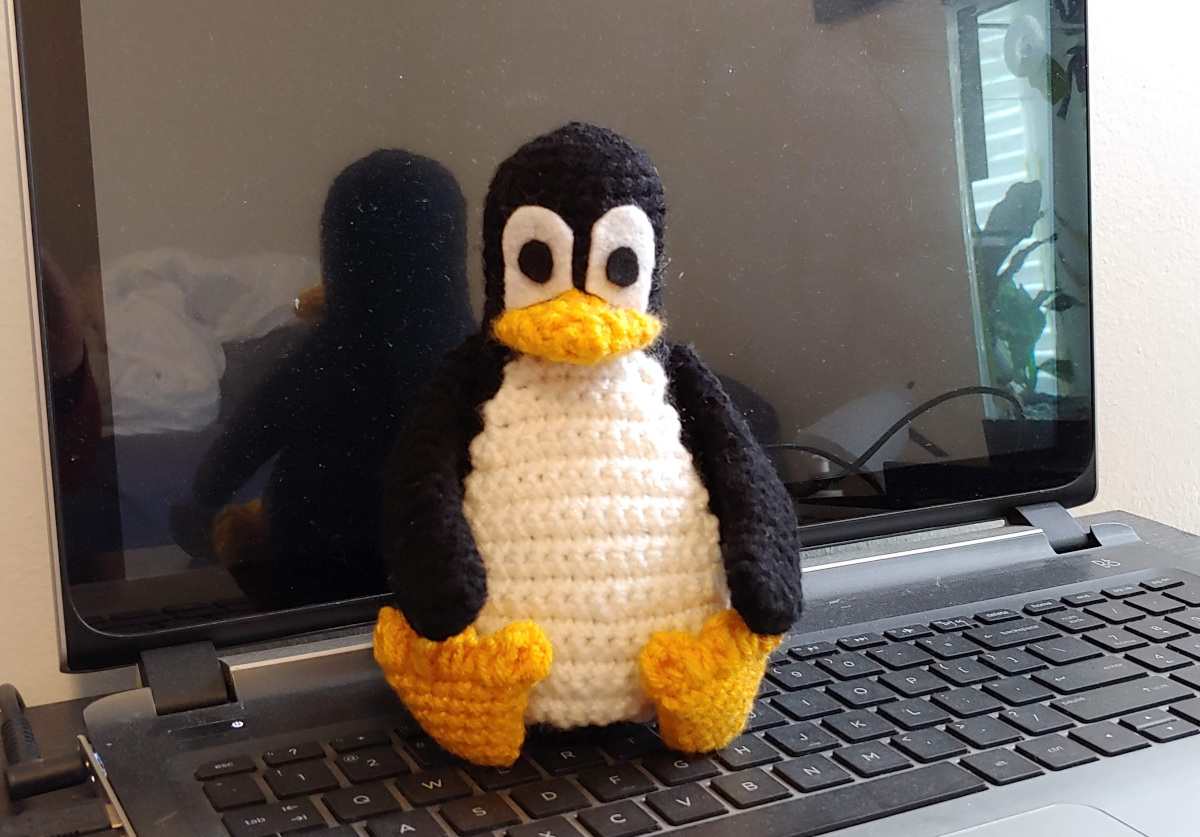
Tux the Linux Penguin
Amigurumi ·Thinking about trying out Rubber Duck Debugging? Well, how about yarn penguin debugging? =P

For this pattern, you will need
- black, white, and yellow-gold worsted weight yarn
- a 5mm crochet hook and a yarn needle
- black and white felt
- hot glue
The pattern below uses American crochet terminology and abbreviations:
- ch = chain
- sc = single crochet
- inc = make 2 single crochets in one single crochet
- inc2 = make 3 single crochets in one single crochet
- dec = either sc2tog or invdec
- fsc = foundation single crochet
Head and Body
The head, body, and tail are worked in one piece. The tail is worked in rounds 29-34.
In black:
- Rnd 1: 6 sc in magic ring
- Rnd 2: inc in 6 sc (12)
- Rnd 3: (sc, inc)*6 (18)
- Rnd 4: (sc 2, inc)*6 (24)
- Rnd 5: sc around (24)
- Rnd 6: sc around (24)
- Rnd 7: sc around (24)
- Rnd 8: (sc 6, sc2tog)*3 (21)
- Rnd 9: sc around (21)
- Rnd 10: sc around (21)
- Rnd 11: sc around (21)
- Rnd 12: (sc 6, inc)*3 (24)
- Rnd 13: sc around (24)
- Rnd 14: (sc 7, inc)*3 (27)
- Rnd 15: sc around (27)
- Rnd 16: (sc 8, inc)*3 (30)
- Rnd 17: sc around (30)
- Rnd 18: (sc 9, inc)*3 (33)
- Rnd 19: sc around (33)
- Rnd 20: (sc 10, inc)*3 (36)
- Rnd 21: (sc 11, inc)*3 (39)
- Rnd 22: (sc 5, inc)*3, sc 21 (42)
- Rnd 23: (inc, sc 6)*3, sc 21 (45)
- Rnd 24: sc around (45)
- Rnd 25: sc around (45)
- Rnd 26: sc around (45)
- Rnd 27: sc around (45)
- Rnd 28: sc around (45)
- Rnd 29: sc 24, sc 10, (inc2), sc 10 (47)
- Rnd 30: sc 24, sc 10, (sc, inc2, sc), sc 10 (49)
- Rnd 31: (sc 13, dec)*2, sc 4, (sc 2, inc2, sc 2), sc 8, dec (48)
- Rnd 32: (sc 2, dec, sc 10)*2, sc 2, dec, (sc 2, sc3tog, sc 2), sc 9 (43)
- Rnd 33: (sc 11, dec)*2, sc 3, (sc, sc3tog, sc), sc 7, dec (38)
- Rnd 34: (sc, dec, sc 9)*2, sc, dec, sc3tog, sc 8 (33)
- Rnd 35: (sc 9, dec)*3 (30)
- Rnd 36: (sc 3, dec)*6 (24)
- Rnd 37: (sc 2, dec)*6 (18)
Pause here to stuff the penguin. He should be round, but not overstuffed. His bottom should be flat so that he won’t tip over. Weighted beads will help.
- Rnd 38: (sc, dec)*6 (12)
- Rnd 39: dec 6 (6)
Fasten off and hide the tail.
Belly
The belly is a flat piece that gets stitched onto the body. Use turning chains between rows. Make the “chain” portion of the foundation single crochet stitches in the post of the nearest single crochet stitch.
In white:
- Row 1: ch 7
- Row 2: sc 7, ch 1 (7 + 1 ch)
- Row 3: sc 8, fsc, ch 1 (9 + 1 ch)
- Row 4: sc 10, fsc, ch 1 (11 + 1 ch)
- Row 5: sc 12, fsc, ch 1 (13 + 1 ch)
- Row 6: sc 14, fsc (15)
- Row 7: sc 15
- Row 8: sc 15
- Row 9: sc 15
- Row 10: sc 15
- Row 11: sc2tog, sc 11, sc2tog (13)
- Row 12: sc 13
- Row 13: sc 13
- Row 14: sc2tog, sc 9, sc2tog (11)
- Row 15: sc 11
- Row 16: sc 11
- Row 17: sc2tog, sc 7, sc2tog (9)
- Row 18: sc 9
- Row 19: sc2tog, sc 5, sc2tog (7)
- Row 20: sc 7
Fasten off and leave a very long tail for sewing.
Wings (make two)
In black:
- Rnd 1: ch 3, then sc 6 around the top and bottom of chain. (6)
- Rnd 2: (sc, inc)*3 (9)
- Rnd 3: sc 9
- Rnd 4: sc 9
- Rnd 5: sc 9
- Rnd 6: sc 9
- Rnd 7: sc 9
- Rnd 8: sc 4, inc, sc 4 (10)
- Rnd 9: sc 10
- Rnd 10: sc 10
- Rnd 11: sc 10
- Rnd 12: sc 10
- Rnd 13: sc 9, inc (11)
- Rnd 14: sc 11
- Rnd 15: sc 11
- Rnd 16: sc 11
- Rnd 17: sc 5, inc, sc 5 (12)
- Rnd 18: sc 12
Fasten off and leave a tail for sewing.
Beak
Make two of the below triangles. Start one of them off with a long tail. This tail will be used for sewing the two pieces together into a beak and for sewing the beak onto the head. Use turning chains between rows.
In yellow-gold:
- Row 1: ch 8, sc 8 (8)
- Row 2: sc2tog, sc 4, sc2tog (6)
- Row 3: sc2tog, sc 2, sc2tog (4)
- Row 4: sc2tog, sc2tog (2)
- Row 5: sc2tog
Feet (make two)
The feet are straightforward except for the toes. The toes are formed using what I’ll refer to as the treble-bobble in the below section, abbreviated as “tr-bobble”. The tr-bobble is fundamentally similar to the more common bobble stitch. Each tr-bobble in the instructions below is formed over two single crochet stitches. Each single crochet stitch will have two almost-completed treble crochet stitches. At the very last step, there should be five loops on your hook.
In yellow-gold:
- Rnd 1: ch 4, sc 8 in top and bottom of chains
- Rnd 2: (sc 3, inc)*2 (10)
- Rnd 3: (sc 4, inc)*2 (12)
- Rnd 4: (sc 5, inc)*2 (14)
- Rnd 5: sc 14
- Rnd 6: (sc 6, inc)*2 (16)
- Rnd 7: sc 16, ch 1 (16 + 1 ch; the extra chain stitch is there to make the first toe easier to make.)
Stop here to lightly stuff the feet. The feet should look mostly flat, just not pan flat. Then, press what you’ve got together so that the top of the feet have eight pairs of single crochet stitches together. Next, to make the toes, do each of the following stitches through two single crochet stitches.
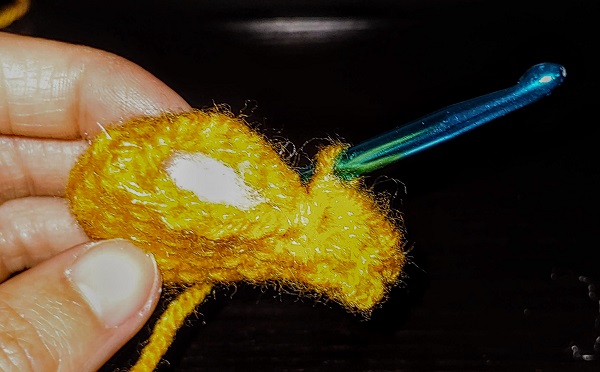
- Top row: t-bobble, sc 1, t-bobble, sc 1, t-bobble
After one toe, your piece should look like this picture:

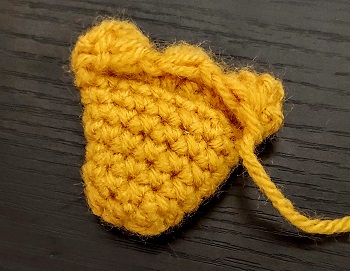
Fasten off by doing a slip stitch into the post of the outermost single crochet. It’ll probably be the only easy place to make one. Leave a long tail for sewing. At this point, your piece should look like:

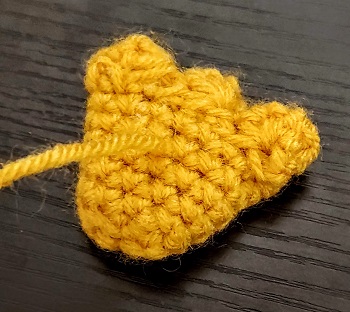
Then, stitch that row down and weave the tail through the stitches so that it comes out the center of the foot, like below:

Assembly
All pieces can be stitched onto the head and body using a yarn needle. Guidelines for positioning of the crocheted components are:
- The top of the beak should be at round 12 of the head and body. The bottom should be sewn over round 13.
- The belly should be sewn right underneath the beak. Angle the top two corners slightly downwards so that there is a little bit of black between the corners of the beak and the belly. (I think this makes Tux look happier.) The top of the belly should be at round 15 and the bottom at round 33.
- The wings should be angled such that the top stitch of the seam is at round 15 and that the bottom is at round 19. There should only be 3-4 stitches between the top of the wings’ seams and the top of the belly.
- The middle of the feet should be at round 31. They should be positioned so that all seven stitches in row 1 of the belly are visible.
Finally, cut the eyes out of black and white felt. The pupils should be circles about 3/8 inches in diameter. The white part of the eyes should be cut so that it the bottoms are flush with the beak and the tops sit between rounds 7 and 8. Hot glue the eyes to the head.
